Why Some Nails Look Amazing IRL But Terrible in Photos
Okay, let’s be real for a second. How many times have you spent an hour doing your nails, thought they looked absolutely perfect, snapped a photo… and immediately wanted to cry? The color looks washed out, the design looks blurry, and what was supposed to be a chic French tip now looks like you dipped your fingers in white-out. Weird, I know, but it happens to everyone.
Honestly, I’ve been there more times than I’d like to admit. Last spring, I wore this gorgeous coral shade that looked vibrant and fresh in person. Tried to take a flat lay photo for Instagram, and it came out looking like… well, let’s just say it wasn’t the aesthetic I was going for. The lighting was wrong, the angle was off, and the color completely lost its warmth. Don’t ask me why, it just happens.
Here’s the thing about nail photography that most people don’t realize: it’s not just about the nails themselves. It’s about how light interacts with the finish, how colors translate through a lens, and how certain designs hold up when you’re not looking at them from six inches away. And as someone who’s been in the beauty industry for years (and has taken approximately a million nail photos), I’ve learned a few tricks.
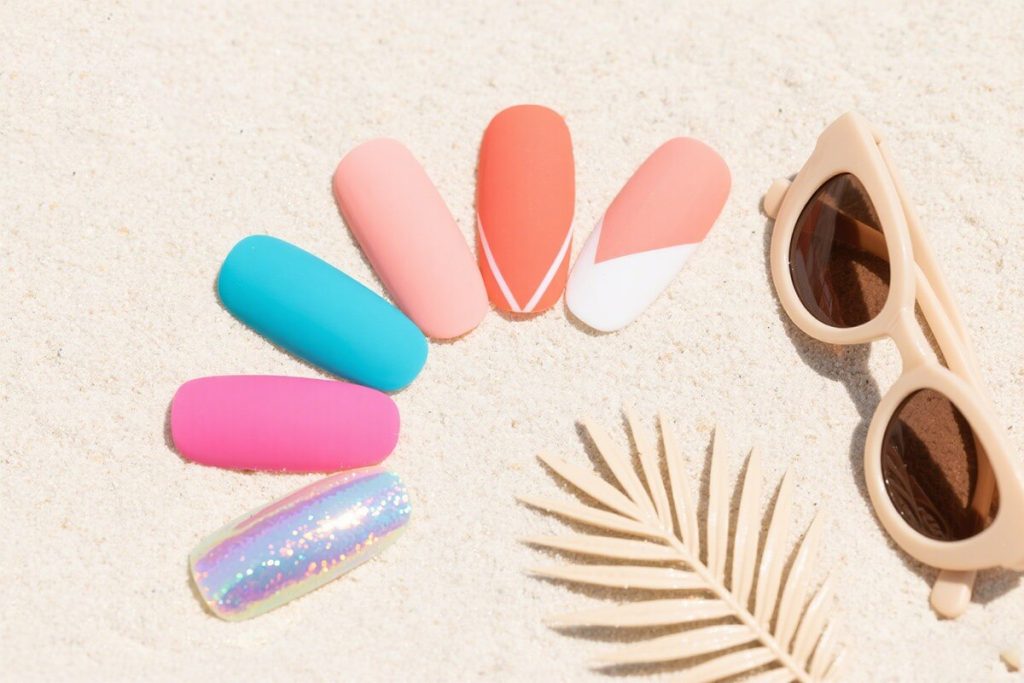
The Spring Colors That Actually Photograph Well
Spring is tricky because we all want those soft, romantic pastels, right? But here’s the secret: some pastels photograph like a dream, while others look completely washed out. It’s all about undertones and saturation.
My absolute favorite for photos right now? Eleglara’s Lavender Dream from their spring collection. The color has this subtle warmth to it that keeps it from looking flat in photos. It’s not just a cool purple—it has these tiny pink undertones that catch the light beautifully. I wore these to my daughter’s spring recital last week, and every single photo my husband took showed the nails looking perfect. Even in different lighting situations!
Other spring shades that photograph exceptionally well:
• Mint greens with a slight blue base (not too yellow)
• Peach tones that lean more coral than orange
• Soft pinks with a touch of shimmer (not glitter—big difference!)
• Milky whites instead of stark whites
The key is avoiding colors that are too muted. You want enough pigment to show up on camera, but not so much that it looks harsh. It’s a delicate balance, but once you find it? Magic.
Designs That Pop on Camera (Without Looking Tacky)
Okay, confession time: I used to think intricate nail art would always photograph better. More detail = more impressive, right? Wrong. So wrong.
Actually, some of the simplest designs photograph the best because they don’t get lost or become a blurry mess. Take Eleglara’s French Tip Classic set. Normally, French tips can be hit or miss in photos—sometimes the white line looks too harsh, sometimes it disappears completely. But their Jelly Gel formula has this translucent quality that makes the white tip look soft and natural, even on camera. It photographs like you got a professional manicure, not like you’re wearing press-ons.
Here’s what works consistently:
Negative space designs (but with clean lines)
Simple geometric patterns (think single stripes or dots)
Ombré effects (when done subtly)
Metallic accents (tiny, not full coverage)
Last month, I tried doing these elaborate floral designs for a spring photoshoot. Spent hours on them. The photos came back and… you could barely see the details. The photographer had to zoom in so much that the composition was ruined. Lesson learned: sometimes less really is more, especially when it comes to nail photography.
The Photography Tricks No One Tells You About
Alright, this is where my years of experience (and many, many failed photos) come in handy. Because here’s the truth: you can have the most beautiful nails in the world, but if you don’t know how to photograph them, no one will ever know.
First: natural light is your best friend, but not just any natural light. The golden hour—that hour after sunrise or before sunset—gives nails this warm glow that makes every color look richer. I’ve tested this with Eleglara’s entire spring collection, and the difference between midday photos and golden hour photos is honestly shocking.
Second: angles matter more than you think. Straight-on shots often flatten the nails. Try shooting from slightly above or at a 45-degree angle to show off the shape and length. And if you’re showing off a design like their Marble Effect set, get close. Like, really close. The swirls and patterns are designed to be seen up close, and they photograph beautifully when you give them the spotlight.
Third: backgrounds can make or break a nail photo. Busy patterns compete with your nails. Solid, neutral backgrounds let your nails be the star. My personal favorite? A simple marble surface or a light wood table. Sounds basic, but it works every single time.
Why Press-Ons Actually Photograph Better Than You’d Think
I know, I know. There’s still this stigma that press-on nails won’t look “real” in photos. Let me tell you a story that changed my mind completely.
A couple years ago, I was doing a collaboration with a photographer friend. We were shooting spring looks, and I’d gotten a salon gel manicure the day before. Halfway through the shoot, one of my nails chipped. Disaster. We had to pause everything while I tried to fix it, and the photos we already took? You could see the chip in some of them.
Fast forward to last spring. I was using Eleglara’s press-ons for a different shoot. One nail got slightly loose. I popped it off, reapplied it with their adhesive (which, side note, is seriously strong but still gentle—VOC-free and everything), and we were back to shooting in under two minutes. The photos came out flawless because every nail was perfect throughout the entire session.
Here’s why press-ons can actually be better for photography:
• Consistency: Every nail is exactly the same shape, length, and color
• No chips or wear during long photoshoots
• You can switch between looks without damaging your natural nails
• The 24 pieces per box mean you have extras if anything happens
And the Jelly Gel material they use? It photographs with this beautiful depth that regular polish often lacks. It catches the light in a way that looks expensive and professional.
My Current Spring Photography Favorites
If you’re looking for specific recommendations for nails that will make your spring photos pop, here are my current obsessions:
For soft, romantic vibes: The Blush Pink set. It has this barely-there quality in person that translates to a delicate, feminine look in photos. Perfect for engagement photos, bridal showers, or just because you want to feel pretty.
For something with a little more personality: The Geometric Pastels. The clean lines photograph so crisply, and the pastel colors are saturated enough to show up without being overwhelming. I wore these to a blogger event last week and got so many compliments on how they looked in group photos.
For beginners who are nervous about photography: Honestly, start with the Natural Short Square. The shape is universally flattering, the length is practical, and the neutral color photographs well in any lighting. It’s like training wheels for nail photography—once you master shooting these, you can move on to more dramatic looks.
Final Thoughts (And a Little Pep Talk)
Look, I get it. Nail photography can feel intimidating. There are so many factors to consider, and when you’re already trying to coordinate an outfit, do your makeup, and figure out your angles, worrying about your nails can feel like one thing too many.
But here’s what I’ve learned after years of trial and error: the best nail photos happen when you’re not overthinking it. When you find a look you love—whether it’s a simple pastel or a subtle design—and you wear it with confidence, that’s what comes through in the photos.
Spring is about renewal and freshness, and your nails should reflect that. Don’t stress about getting the “perfect” shot. Experiment with different colors from Eleglara’s collection (they’re beginner-friendly, I promise), play with lighting, and most importantly: have fun with it.
Because at the end of the day, the most beautiful nail photos aren’t the ones with perfect lighting or the most expensive camera. They’re the ones where you can tell the person wearing them feels amazing. And if a set of press-ons that photograph beautifully helps you get there? Well, that’s just the cherry on top of a very pretty spring sundae.
Now if you’ll excuse me, I need to go take some photos of my new lavender nails before the golden hour ends. Wish me luck!