That Spring Feeling (And Why Your Nails Need It Too)
Okay, can we just take a moment? The sun is finally sticking around past 5 PM, my winter coats are officially banished to the back of the closet, and there’s this… lightness in the air. It’s the perfect time for a refresh, right? New skincare, maybe a closet purge. But honestly? My first stop is always my nails. After months of those deep burgundies and moody navies (which I love, don’t get me wrong), my fingertips are literally begging for something brighter. It’s not just about color, though. It’s about the whole vibe. A spring nail refresh is like opening all the windows after a long winter—it feels clean, optimistic, and just plain good.
Weirdly, I find my mood is so tied to my manicure. A chipped, grown-out set in February? Fine, it matches the gray skies. But a chipped set in April? It feels wrong. Like wearing boots with a sundress. So if you’re feeling that same itch for something new, you’re in the right place. Let’s ditch the heavy formulas and dark palettes together and talk about giving your nail routine a proper spring awakening.
Step 1: The Great Color Shift (Embrace the Light!)
This is the fun part. Out with the old, in with the… well, not *new* new, but definitely lighter. Think of your nail color palette like your wardrobe. You wouldn’t wear a cashmere turtleneck in 70-degree weather (I hope).
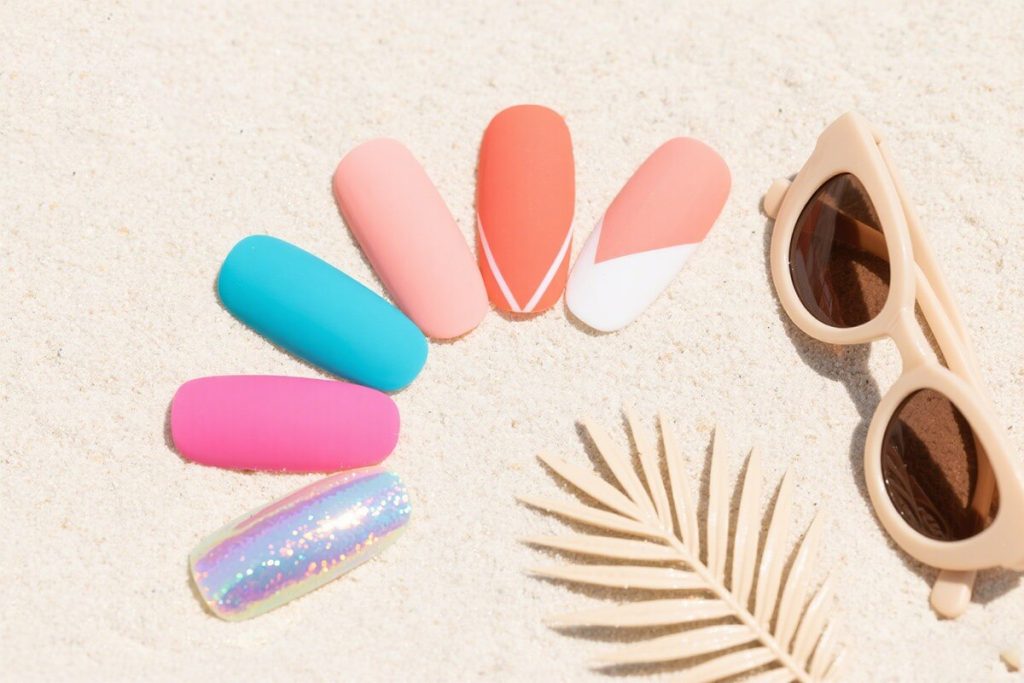
My personal rule of thumb? If it looks like it belongs in a cozy cabin by a fire, it’s a winter color. If it makes you think of sunshine, flowers, or a crisp gin and tonic, it’s a spring color. We’re talking soft nudes that look like your nails but better, barely-there pinks, milky whites, and those gorgeous sheer tints. Lavender is having a major moment—it’s like the perfect bridge between playful and sophisticated. And don’t even get me started on sage green. It’s the neutral that isn’t boring.
Here’s a little anecdote from just last week: I was trying to force a dark plum because I hadn’t finished the bottle. My daughter looked at my hands and said, “Mom, your nails look sad.” Out of the mouths of babes, right? She was totally right. I swapped them out that night for a soft ballet slipper pink, and I swear my whole outlook felt brighter the next morning. Don’t ask me why, it just works.
If you’re a press-on fan like me, this is where it gets really exciting. A brand like Eleglara is perfect for this seasonal switch-up because you can completely change your vibe without commitment. One day you can rock a classic French tip with their Classic French set, and the next, you can try a trendy lilac shade. It’s like a capsule wardrobe for your fingertips. And with 24 pieces in a box, you have plenty for a full set plus backups for accidents—because life happens, especially with a kid. The Jelly Gel material they use is fantastic for these lighter shades; it gives a really natural, gel-like depth without looking opaque or cheap.
Step 2: Nail Care Isn’t Boring, I Promise
Okay, lecture time. But a nice, warm, big-sisterly lecture. You can’t put a beautiful spring color on sad, neglected nails. It’s like putting a fresh coat of paint on a wall with holes in it. The foundation matters.
Winter is brutal on our hands. All that dry air, harsh soaps, and constant temperature changes leave our nails and cuticles parched. My first move every spring is to become a hydration fanatic. I keep cuticle oil everywhere—next to my bed, on my desk, in my purse. Applying it is my new fidget habit. And honestly, it makes such a difference in just a few days.
File, don’t clip! This is my biggest nail care hill to die on. Clipping can cause micro-splits and weaken the nail plate. A gentle glass file in one direction is the way to go. It creates a smoother edge that’s less likely to catch and tear. And for the love of all that is holy, put down the metal pusher on your cuticles. Soak, gently nudge them back with a wooden stick, and oil, oil, oil.
If your nails are thin and peeling from winter wear and tear, give them a break from polish every now and then. Let them breathe for a few days between manicures. Or, here’s my secret: use a protective press-on. Seriously. A short, natural-looking press-on set acts like a little shield, protecting your natural nails from water, detergent, and daily abuse while they grow out underneath. It’s a win-win. You get pretty nails, and your real ones get a chance to recover. I often use the Short Almond Nude set from Eleglara for this exact purpose. They’re beginner-friendly, look incredibly real, and give my nails a vacation.
Step 3: The Application Revolution (Keep It Simple)
Gone are the days of messy, complicated, hour-long nail sessions. At least for me. As a mom, my time is sliced thinner than deli meat. My spring refresh philosophy extends to the *how* as much as the *what*. I want my routine to be quick, clean, and foolproof.
If you’re using traditional polish, a good base and top coat are non-negotiable. They prevent staining from those pretty pastels and make your mani last. But let’s be real, sometimes you just don’t have 45 minutes for drying time.
This is where modern press-ons have been a total game-changer for me. The technology has come so far. The good ones, like the ones I use, aren’t those thick, plasticky things from the 90s. They’re thin, flexible, and shaped beautifully. The key is in the adhesive. You want something strong but also gentle when it’s time to remove. I’m a huge advocate for brands that prioritize safety, especially since I’m more conscious about what I put on my body now. Knowing a product is VOC-free and safe even during sensitive times like pregnancy (not me right now, thank goodness!) gives me real peace of mind.
My application tip? Prep is everything. Wipe your nails with the included alcohol pad, find the size that fits each nail *perfectly* (don’t force a slightly big one—file it down!), press firmly for 30 seconds, and you’re done. I can do a full set during my daughter’s afternoon cartoon time. It’s my little moment of self-care that actually fits into my life. And the removal is just as easy—soak in warm water and they slide right off without damage. No scraping, no acetone fumes. It’s civilized.
Step 4: Play With Texture & Detail
Spring isn’t just about color; it’s about texture and light. This is where you can have some real fun and let your personality shine through.
Think about finishes. A glossy, high-shine nude is eternally chic. But a matte pastel? Unexpected and cool. You could even do a mix on different nails. I also love a subtle shimmer—not full-on glitter, but a fine, pearlized dust that catches the light. It reminds me of morning dew.
Nail art doesn’t have to be intimidating. A single tiny flower on your ring finger. A thin, delicate line drawn along the tip in a contrasting pastel. A minimalist dot design. These little details feel fresh and festive for the season. If you’re not artistically inclined (raises hand), look for press-on sets that already have these designs incorporated. It takes the pressure off and guarantees a perfect result every time.
Honestly, sometimes the most refreshing thing is just a perfect, clean shape. If you’ve been rocking long stilettos all winter, try a short, rounded square or a soft almond for spring. It feels modern, practical, and just… new. Changing your nail shape can change your whole hand silhouette.
Your Spring Nail Refresh Checklist
Let’s wrap this up with a simple, actionable list. No fluff, just the stuff that works.
1. Color Palette: Clear out the deep darks. Embrace nudes, pinks, lilacs, sages, sheers, and milky whites.
2. Hydration Station: Invest in a good cuticle oil. Use it multiple times a day. Your future self will thank you.
3. Gentle Shaping: Put the clippers away. Use a fine file and shape with care.
4. Explore Easy Options: Don’t be afraid of high-quality press-ons for a quick, safe, and stunning change. They’re perfect for protecting your natural nails or trying a trend without commitment.
5. Have Fun: Add a little detail—a different finish, a simple design, a new shape. Let your nails reflect that lighter, brighter spring energy.
Refreshing your nail routine should feel uplifting, not like a chore. It’s a small act of self-care that you get to see all day long. So put on some music, pour yourself something refreshing, and give your fingertips the spring makeover they deserve. You’ve got this. And if all else fails, there’s always a perfect set of press-ons waiting in a box to save the day. Trust me, I’ve been there.