Why Bother With Stickers When You Can Just Get Gel?
Okay, real talk – I used to be that person who thought nail stickers were for kids. Like, the kind you get in those little quarter machines at the grocery store. Then one Tuesday afternoon, I was trying to do my daughter’s nails with these adorable bunny decals she begged for, and I had that classic mom moment of “wait, why aren’t I doing this for myself?”
Honestly, the transformation you can achieve with some well-placed stickers and water decals is borderline magical. And before you ask – no, it doesn’t look cheap or childish when you do it right. We’re talking salon-level detail without the $80 price tag or the two-hour time commitment. Plus, let’s be real – sometimes you want something more specific than what’s available pre-designed, you know?
The Sticker vs. Water Decal Showdown
So here’s the thing most people don’t realize – there’s a difference between regular nail stickers and water decals, and which one you choose totally depends on what kind of vibe you’re going for.
Regular stickers – the kind with adhesive backing – are your quick fix. They’re perfect for when you’re running late but still want your nails to look intentional. I keep a pack of the Eleglara accent stickers in my purse for emergency nail situations (which happen more often than I’d like to admit).
Water decals, though? Those are the secret weapon. They’re thinner, they blend seamlessly into your nail, and they give you that painted-on look that makes people do a double-take. The first time I used them, I literally texted three friends like “GUYS. My nails look professionally airbrushed and I did them during naptime.”
My Go-To Setup for Decal Domination
Alright, let me walk you through my absolute essential toolkit. This isn’t some fancy professional setup – this is what actually lives in my bathroom drawer and gets used regularly.
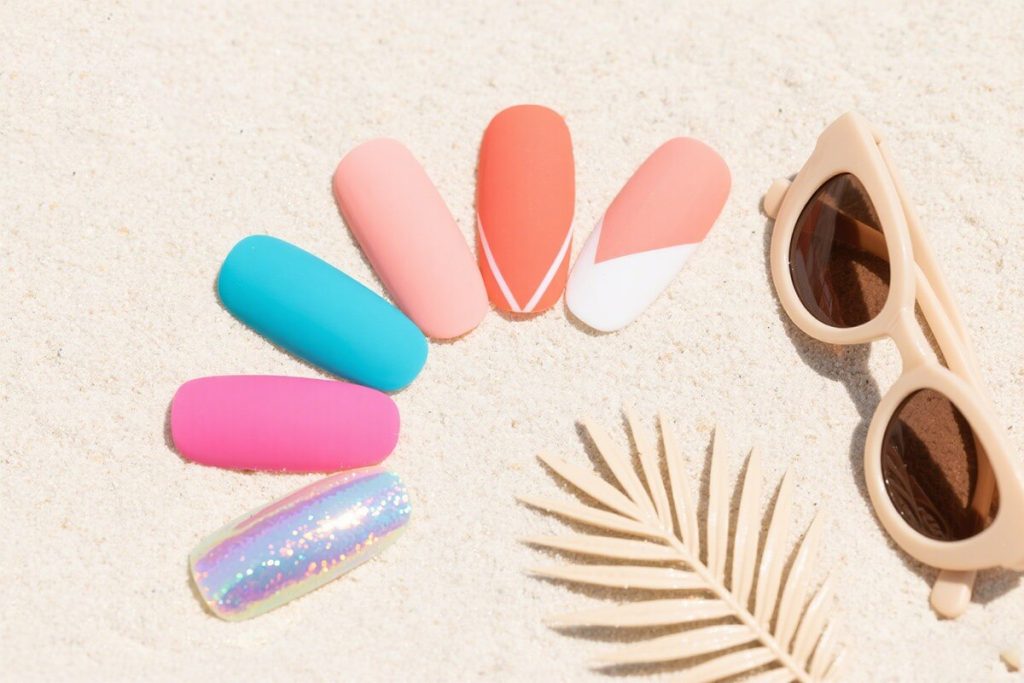
First, you need a good base. I’m partial to Eleglara’s Jelly Gel press-ons because the surface is just perfect for applying decals – not too slick, not too textured. Plus, the 24 pieces per box means you have plenty to practice on without worrying about wasting your good nails.
Then you’ll need: a small bowl of room temperature water (hot water can mess with the adhesive, cold takes forever – Goldilocks situation), tweezers (the pointy kind, not the slanted ones), a small brush for smoothing, and a top coat. I cannot stress the top coat enough – it’s what separates the “lasts two days” from the “lasts two weeks” applications.
The Water Decal Application That Actually Works
Okay, here’s where I see most people mess up – they rush the water part. Don’t be that person. Take the extra thirty seconds, I promise it’s worth it.
Cut out your chosen decal with a little border around it. Don’t try to cut exactly to the edge – you’ll drive yourself crazy and probably tear it. Submerge it in your water bowl for about 15-20 seconds. Here’s my weird little trick: I count to twenty Mississippi. Don’t ask me why it works better than just counting normally, but it does.
When it starts sliding around on the backing paper, use your tweezers to gently lift it. Place it on your nail – and this is crucial – position it before it fully dries. Once you’re happy with the placement, use your brush to smooth out any bubbles from the center outward. Let it dry completely before moving to the top coat step. Seriously, wait until it’s not shiny-wet anymore. I’ve ruined more designs by being impatient than I care to admit.
Sticker Application for When You’re Short on Time
Some days you just need instant gratification, and that’s where regular stickers shine. The process is simpler but still has its tricks.
Make sure your nail surface is clean and dry – no lotion residue, no oils. Peel your sticker carefully from the backing. I like to use the tweezers for this too because my fingers always seem to be slightly sticky at the worst times.
Place it where you want it, then press from the center out. Here’s my pro tip: go over it with a clean, dry cloth and really press hard. The heat and pressure help activate the adhesive better. Then top coat immediately – unlike water decals, you don’t need to wait for these to dry first.
Mixing and Matching Like a Pro
This is where it gets really fun. Don’t feel like you have to stick with just one type of decoration per nail. Some of my favorite designs combine both techniques.
Last week I did a set where I used Eleglara’s French tip press-ons as a base, added tiny floral water decals near the cuticle, then used metallic stripe stickers to create accent lines. Sounds complicated but honestly took me less time than it took my toddler to eat one chicken nugget.
The key is thinking about texture and dimension. Water decals lay flat, stickers have a tiny bit of height – when you combine them strategically, you create depth that looks incredibly professional. Start with your flattest elements first (water decals), then add dimensional elements (stickers), then seal everything with a good top coat.
Top Coat: Your Secret Weapon
I cannot overstate how important a good top coat is. It’s the difference between your design lasting through multiple hand washes and toddler baths versus peeling off after one dishwashing session.
Apply two thin coats rather than one thick one. Thick coats take forever to dry and can cause smudging. Thin coats dry faster and create a more durable finish. Wait a few minutes between coats – I usually use this time to clean up my workspace or, let’s be real, scroll through Instagram.
Pay special attention to the edges of your stickers and decals. Run the brush along the perimeter to really seal them in. This is what prevents that annoying lifting at the edges that gives away that you used stickers instead of professional nail art.
Fixing Mistakes Without Starting Over
We all mess up. I’ve been doing this for years and I still occasionally put a decal on upside down or crooked. The beauty of working with press-ons instead of your natural nails? You can fix mistakes easily.
If you catch a water decal mistake immediately, you can often slide it off and reposition it while it’s still wet. If it’s already drying, a tiny drop of water on a Q-tip can reactivate the adhesive enough to adjust.
For sticker mistakes, gently lift from one corner with your tweezers. If the adhesive is already strong, you might need to use a tiny bit of nail polish remover on a cotton swab to loosen it. Just be careful not to get remover on the rest of your design.
When to Go Simple vs. When to Go All Out
Here’s my personal philosophy: not every nail needs to be a masterpiece. Sometimes one accent nail with detailed decals surrounded by simpler designs looks more sophisticated than ten wildly decorated nails.
For everyday wear, I love doing a simple French tip with one nail featuring a small, elegant decal. For special occasions? Go wild. Mix patterns, layer different types of decorations, create themes. The beauty of press-ons is that you’re not committed forever – you can be as bold or as subtle as your mood dictates.
My Favorite Eleglara Combinations Right Now
Just in case you need some inspiration, here are a few of my current go-to combinations using products from their shop:
The “Coffee Date” – Start with the classic nude square nails, add tiny coffee cup water decals to two fingers, finish with matte top coat. Looks expensive but took me fifteen minutes.
The “Garden Party” – Use the floral print press-ons as a base, then add pearl accent stickers along the cuticle line. So feminine without being overly sweet.
The “Modern Minimalist” – Clear almond nails with geometric stripe stickers in black and gold. Looks like something you’d see in a high-end salon but literally costs a fraction of the price.
Why This Beats Salon Visits Every Time
Look, I love a good salon day as much as the next person, but between work, motherhood, and general life chaos, finding two free hours is like finding a unicorn. With press-ons and decals, I can create salon-quality nails during naptime or while watching TV after my daughter goes to bed.
Plus, the customization possibilities are endless. Salons have limited designs and charge extra for detailed nail art. With stickers and decals, you can create exactly what you want without the upcharge. And since Eleglara’s press-ons are VOC-free and safe for pregnancy, I never worry about what I’m putting on my body.
Honestly, the first time someone complimented my nails and asked where I got them done, I felt so smug saying “oh, I did them myself.” That never gets old.
Your Turn to Try
Don’t be intimidated by the process. Start simple – maybe just one accent nail with a small sticker. See how it feels. I promise once you get the hang of it, you’ll be looking at every plain press-on as a blank canvas waiting for your personal touch.
And if you mess up? Who cares? They’re press-ons. Take them off and try again. The beauty of this whole process is that there are no permanent mistakes, just learning opportunities. Now go make some beautiful nails – you’ve totally got this.