The Reality Check Before We Begin
Okay, let’s get real for a second. When I first thought about starting my own press-on nail line back in 2019, I almost fell down the rabbit hole of buying every single tool, gadget, and shiny object the beauty industry told me I “needed.” I had Pinterest boards filled with professional nail stations that cost more than my first car. And honestly? Most of that stuff just collected dust.
Here’s the truth bomb: you don’t need a $500 LED lamp or a professional salon setup to create beautiful press-ons that people will actually buy. What you do need is strategic thinking, some basic tools, and the willingness to learn through trial and error. Weirdly enough, some of my best-selling designs came from mistakes I made with cheap tools during my learning phase.
The Non-Negotiable Starter Kit
Let’s start with what you absolutely cannot skip. These are the tools that will make or break your press-on quality, and honestly, you can get most of them for under $100 total if you’re smart about it.
First up: nail files and buffers. Don’t cheap out here, but don’t go luxury either. I learned this the hard way when I bought a $40 crystal file that shattered after two weeks. Get yourself a good 180/240 grit file for shaping and a buffer block for smoothing edges. The difference between professional-looking press-ons and cheap ones often comes down to how well you’ve prepped and finished the edges.
Next, cuticle pushers and nail cleanser. This is where I see so many beginners mess up. You need to properly prep both the natural nail and the press-on for application. I keep it simple with wooden cuticle sticks and 91% isopropyl alcohol. Seriously, that $2 bottle from the drugstore works better than most fancy nail prep solutions I’ve tried.
The Adhesive Situation: My Personal Journey
Oh boy, adhesive talk. This is where I could write a whole novel about my failures and triumphs. When I started, I thought all nail glues were basically the same. Wrong. So wrong.
After ruining three sets of beautiful hand-painted designs with cheap glue that yellowed and lifted within hours, I finally understood why professional-grade adhesive matters. But here’s the budget-friendly secret: you don’t need to buy the most expensive brand. Look for odorless, brush-on formulas that dry clear. And always, ALWAYS do a patch test before committing to a full set.
Side note: I once used a “bargain” glue that smelled so strong my husband thought I was refinishing furniture in our bedroom at 2 AM. Not my finest moment.
Nail Forms That Won’t Break Your Budget
Okay, let’s talk about the actual nails. This is where most people either overspend or cheap out too much. Finding that sweet spot is everything.
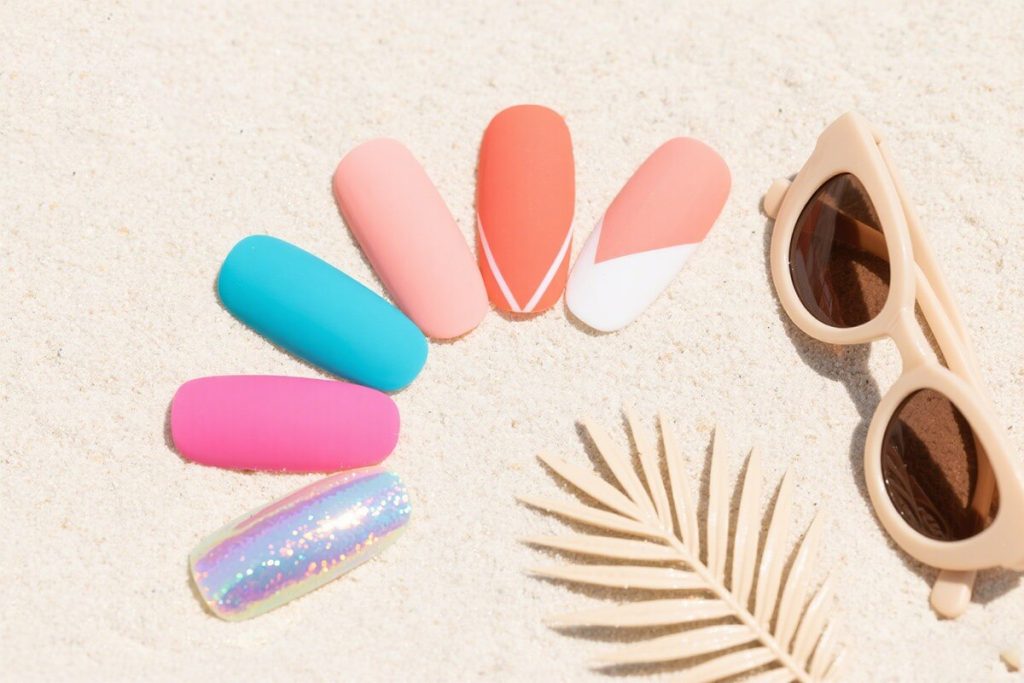
When I was testing different blank nails for my early collections, I went through probably twenty different brands. Some were so thin they’d snap during application, others were so thick they looked like acrylics from the 90s. After months of frustration, I discovered that medium-thickness blanks with good flexibility were the answer.
Here’s a little insider tip: look for nails that have a slight curve and thin tips. They look more natural and are easier for customers to apply. And honestly? Some of the best blanks I’ve found are from Eleglara’s professional line – they’re the perfect balance of durability and natural appearance without that plastic-y look that screams “cheap press-ons.”
The Decorating Department: Where Creativity Meets Budget
This is my favorite part because it’s where your personality really shines through. But it’s also where costs can spiral out of control if you’re not careful.
Start with the basics: a good set of detail brushes, dotting tools, and a few quality gel polishes in your signature colors. You don’t need fifty shades of pink when you’re starting out. Pick 5-7 core colors that represent your brand’s vibe and master working with those.
And about that lamp situation I mentioned earlier? You really don’t need the giant professional one. A small 48W LED lamp will cure your gels perfectly fine. I used a $25 Amazon lamp for my first year in business and never had curing issues. The key is timing, not wattage.
One more thing about decorations: rhinestones and charms. Buy in small quantities initially. I made the mistake of ordering 500 rose gold stars because they were “such a good deal” and ended up using maybe twenty before my design aesthetic evolved. Now they live in my “what was I thinking” box of beauty supplies.
Packaging That Doesn’t Scream “I’m Broke”
Packaging is where your brand personality meets your customer, but it doesn’t have to cost a fortune to look professional.
When I launched my first collection, I spent weeks researching custom boxes and ended up spending way too much on something that didn’t even represent my brand well. What I learned: start simple. Clear plastic boxes with your custom logo sticker, maybe some tissue paper in your brand colors, and a handwritten thank you note.
Customers actually love the personal touch of handwritten notes. I’ve had people message me saying they kept the note because it made them feel special. And that costs you basically nothing but a few minutes of your time.
Photography Setup: Phone Not Required
Wait, let me rephrase that. Your phone IS required, but you don’t need a professional camera or lighting setup to take great product photos.
My early product photos were taken on my iPhone with natural light from my bedroom window and a piece of white poster board as a background. The secret? Consistency. Pick a style and stick with it across all your photos.
Invest in a cheap phone tripod and learn how to use your phone’s manual camera settings. The difference between shaky hand-held shots and tripod-stabilized images is night and day. And for editing? Free apps like VSCO or Lightroom Mobile are more than enough when you’re starting out.
Inventory Management: Don’t Become a Nail Hoarder
This is the lesson I wish someone had drilled into my head from day one: only make what you can reasonably sell in a short period.
I got so excited about creating that I ended up with hundreds of sets sitting in my closet, some of which never sold because trends changed. Start with small batches of your most popular sizes and designs. Pay attention to what sells and make more of that. It seems obvious, but when you’re in creative mode, it’s easy to get carried away.
Another budget tip: track your material costs per set from the beginning. I didn’t do this at first and was probably losing money on some of my more elaborate designs without even realizing it.
The Learning Curve: Embrace the Messy Parts
Here’s the thing nobody tells you about starting a press-on business: you’re going to mess up. A lot. And that’s okay.
I’ve had designs that looked amazing in my head but terrible in execution. I’ve used the wrong top coat and ruined hours of work. I’ve even packaged orders with the wrong sizes (sorry to that customer who got two pinky nails instead of thumbs – I still cringe thinking about it).
But every mistake taught me something valuable. The messy, imperfect journey is what makes your brand authentic. Customers can sense when something is made with genuine care and learning, not just churned out perfectly from day one.
When to Invest in Better Tools
As your business grows, you’ll know when it’s time to upgrade. For me, it was when I was spending more time fighting with my cheap tools than actually creating.
The first thing I upgraded was my lamp – not because I needed more wattage, but because my $25 one finally died after curing approximately a million nails. Then I invested in better brushes that didn’t shed bristles into my designs. Small upgrades that made a big difference in both quality and my sanity.
But here’s the key: upgrade based on your actual needs, not what Instagram tells you you should have. If you’re not doing intricate nail art, you don’t need that $80 brush set. Be honest with yourself about what will actually improve your process and product.
Final Thoughts From Someone Who’s Been There
Starting a press-on nail business on a budget is totally possible if you’re strategic about where you put your money. Focus on the essentials first, master those tools, and then grow from there.
Remember that your unique perspective and creativity are what will make your brand stand out, not having the most expensive equipment. Some of my most successful designs came from limitations – having to work with what I had forced me to be more innovative.
And honestly? The journey of building something from nothing, even with budget constraints, is one of the most rewarding experiences I’ve had in this industry. The late nights, the failed experiments, the first five-star review – it all becomes part of your brand’s story.
So take that first step, embrace the learning process, and don’t let perfectionism (or a limited budget) stop you from creating something amazing. Your future customers are waiting for what only YOU can create.